A December to Remember: Handmade Ornament Exchange Party
Happy Handmade Holidays! Last Saturday’s cozy get together with crafty friends for a handmade Christmas ornament exchange was one of the highlights of this year’s Christmas season for me. I’ve hosted handmade ornament exchanges twice before in past years, but it had been four years since the last exchange. (Where does time go?) This year I organized the event; my mom and I provided snacks; and my friends Erin and Deanna graciously hosted the event at their art studio Caravan Classes in downtown Noblesville. This is the same awesome studio that had an Artist Halloween Party I blogged about. It’s such a beautiful, creative space bursting with inspiration and is such a great art hub for makers of all ages!

Participants for the exchange signed up at the beginning of the October so we’d have plenty of time to make our ornaments, but of course a lot of us “procraftinated” and did the majority of our work on them in the two weeks leading up to the exchange. I’m pretty sure procrastination is a trait of truly creative people.
The only rule for the exchange was to make one ornament per participant. Ornaments could be made all the same or each one different. Any material could be used, and we ended up with such a wonderful variety: paper, yarn, felt, copper, paint, plus lots of little extra embellishments like beads and glitter.
My mom made a wonderful lemon cake using a Nordic Ware gingerbread house bundt cake pan I received as a Christmas gift last year from my cousin and his wife. I believe the powdered sugar sprinkled-cake was responsible for the winter weather, as we got our first dusting of snow of the season, and the houses outside looked exactly like the cake. We also had spinach dip in a bread bowl, Mom’s chocolate peanut butter squares, mini chocolate gingerbread cookies, peanut butter-filled pretzels, a selection of several cheeses and crackers, and cranberry and herb & garlic goat cheese spreads.

I brought tissue paper and Christmas printed boxes for everyone to take their ornaments safely home in. The boxes were the holiday prints of Michael’s versatile photo boxes that are on sale this time of year. I use them not only to keep my photos in but also to store and organize craft supplies in and to wrap Christmas gifts. They’re beautiful for gift giving with a sheer bow tied around them, and when they’re on sale they cost the same price as a gift bag.

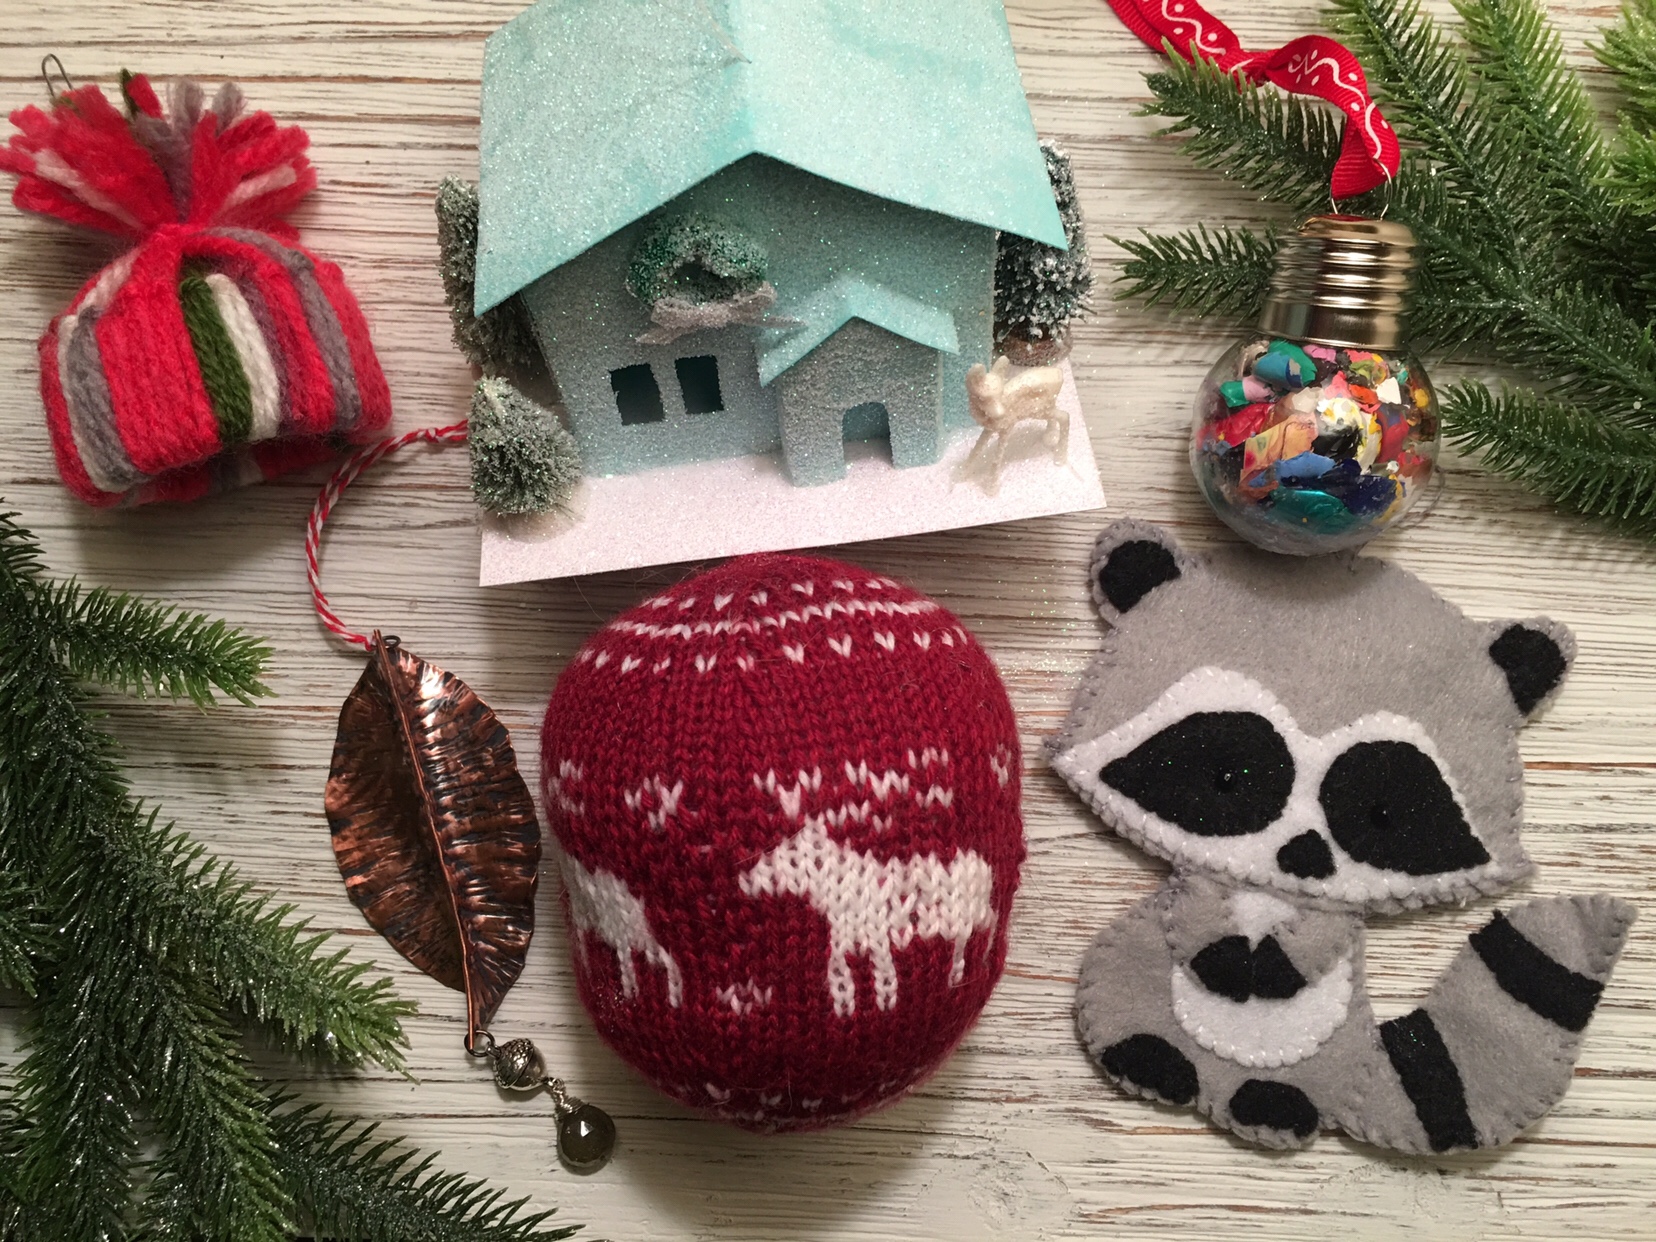
This year’s crop of handmade ornaments blew me away! Each one is so special and completely different, and they look great hanging on my tree. So much time and love went into them.

Jen is a metalsmithing master and makes the most beautiful jewelry. Her copper leaf ornaments are incredible. She cut squares of copper and folded them in half using confirming pliers. She then annealed (heated), quenched (brought back to room temperature), and pickled (cleaned) the copper. She cut the folded copper into a taco shape, and repeated the annealing, quenching and pickling process. She hammered the copper “taco” along the rounded side. Then she repeated the annealing, quenching and pickling process once again and pried open the copper taco to reveal the leaf! The dark coloration comes from a liver of sulfur solution. She sanded and polished the metal and added a green garnet briolette gemstone and acorn bead to finish off this super impressive ornament.


Wendie wrote a fantastic blog post about how she created her intricate hand-knit ornaments, and you can see photos of all her beautiful creations and more details about the patterns and techniques she used there as well. Her ornaments were all made using maroon and white yarn and each one was unique. She knitted little sweaters, ball ornaments, Stärjna (stars), and hat ornaments.


Missy made these adorable felt forest critter ornaments. She used a pattern from Etsy and pieced and sewed them together. I always look forward to her sewing, cross-stitch, and fabric crafts. I had a hard time picking which one I wanted, because I wanted them all!

Erin made yarn hat ornaments based on an idea she saw on Pinterest, and she demonstrated how to make them to us. They look like they would be addictive to make once you start, and they’re a fantastic way to use up extra yarn. She started by cutting a section from a paper towel or toilet paper cardboard roll to create a ring base. Then she cut yarn into equal lengths and folded the strands in half and pushed the loop side through the paper roll. She folded the other end over the paper roll and into the loop and pulled to secure the yarn. She repeated this process until the roll was covered with yarn, changing colors as desired. She tied a knot around the threads and trimmed the yarn evenly to create the pom pom of the hat. Erin also taught this craft to her middle school art students who had a blast making their own colorful hat ornaments.

Deanna created colorful bulb ornaments filled with dried paint scrapings she saved from class projects and palettes used at Caravan Classes studio. So much leftover paint was needed to fill each ornament. The ornaments were heated to melt the paint into a pretty design. These ornaments are a clever and creative way to preserve art memories forever.

Marilee (my mom) made winter village house ornaments using a template found on Martha Stewart’s web site. The houses were inspired by a Pottery Barn advent calendar she showed me as an idea to adapt to ornaments, and when I saw it, I recalled that Martha Stewart had a house pattern available online I’d bookmarked several years ago. Using the template, each house was cut out from cardstock by hand using craft scissors and an Xacto knife, then folded and adhered together with thin super sticky double sided adhesive tape. The bases are made of two layers of thick tag stock, sturdy enough to hold the weight of the house and the small embellishments that were glued to them. The tiny wreaths were made from pipe cleaners. Fishing line was used for the hangers. At the end houses were covered with spray adhesive and then doused in ultrafine glitter.


My lighted shadowbox ornaments were made using stamps, dies and trimmings from the All Through the House kit from Papertrey Ink. I also used some additional embellishments I had on hand for the tree ornaments. I watched Papertrey Ink’s video on how to make the ornaments before starting. The first step is to die-cut and assemble the shadowbox from white cardstock. I punched holes for the hanger and die-cut a small hole for the light to shine through from the underside of the ornament. Eyelets were used to reinforce the hanger holes and also give it a nice look, and velvet ribbon was looped through the holes and adhered with thin super sticky double sided adhesive tape. The same tape was used to adhere the sides of the folded matchbox shape. A paper-thin LED light was adhered to the bottom of the shadowbox with the tape, and then I decorated the inside of the shadowbox with shapes I die-cut from patterned cardstock plus glitter, craft snow, ribbon, wreaths, wood mice and other embellishments. The last step was to run all edges of the matchbox front through a puddle of Aleene’s turbo tacky glue I squeezed onto waxed paper, and glue on a frame I die-cut from the patterned cardstock. The lights can be turned to fast blink, slow blink, or constant on, and replaced after the battery wears out.


A special thank you to Erin Goodman for providing some of the photos used in this blog post. Many thanks also to Deanna and Erin for hosting this wonderful get together for us!
What crafts or handmade gifts are you working on this Christmas season? I’d love to hear about them in the comments!
Related Posts

Fit to be Dyed: Easter Egg Decorating Fun at Home
Decorating Easter eggs turned out to be the perfect stay-at-home Easter activity for…
16 December, 2017
Gingerbread Dreams: Sweet Treats & Shoppe
Merry Christmas! I hope you’re having a wonderful holiday filled with all of…
16 December, 2017
Katie C. | 16th Dec 17
These are all so incredible!!!!! And such an amazing way to celebrate, share, AND bring home some seriously impressive ornaments for yourself! I couldn’t decide which I liked best— I am astounded at how perfect all of these are, and so creative!
Denise Breimeir | 16th Dec 17
My friends are so talented! I was blown away by all the ornaments too. I’ll treasure them always! I think we’ll have to do the exchange again next year!
Marilee Breimeir | 16th Dec 17
The ornament exchange was so fun! Such a nice variety and they all look lovely on my Christmas tree. Thanks to Erin and Deanna for hosting at their studio. A special thanks to you Denise for organizing the exchange. I just love, love Wendie’s pretty white knitted star on my tree! 🎄
Denise Breimeir | 16th Dec 17
Your glitter houses are amazing! I am so glad you made them. They are better than Martha Stewart and Pottery Barn combined! Thank you also for that fantastic cake, the labeled cheeses (so organized!), and the chocolate peanut butter squares.
Wendie | 2nd Jan 18
As always, this exchange was tons of fun! It’s becoming one of my favorite traditions of the holidays. Thank you so much for organizing and thanks to Erin and Deanna for hosting us all!
Denise Breimeir | 4th Jan 18
It was a fun afternoon! The timing was perfect too as we were able to finish our ornaments and get together before we all got so busy!