Sending off Summer with a Craft-Filled Summer Camp Recap
Hello Gnomies! It’s been awhile since my last post, but I’m back on the blog! Today marks FOUR YEARS since Gnome Decor launched! We’ll be celebrating Gnome Decor’s birthday week from September 30 – October 6. Stay tuned for new blog posts this week, culminating in the release of FOUR limited edition Handmade Halloween boxes you won’t want to miss! Here in central Indiana, it still feels like summer, so for my first post I wanted to share one of the things I was up to this summer! One of my favorite stamp companies, Concord & 9th, hosted a virtual craft retreat June 25-26 called C9 Summer Camp. I debated whether to register or not because I knew that would be a busy weekend and I would miss participating in most of the workshop live. I am so glad I decided to sign up, because this turned out to be the best online event I have ever attended. The whole format was so well organized and executed, and it was just so much fun! The livestream videos were recorded for later playback, so I was able to complete the projects as time allowed. I enjoyed working at my own pace; I could pause and rewind as I crafted along to the videos. I missed my goal of finishing all the projects by Labor Day, but did complete them before the official first day of fall! Concord & 9th created an interactive Facebook group especially for campers, and activity in the group continued well beyond the end of camp so it was fun to see what others were working on – and also reassuring to know I wasn’t the last one to finish the projects!
The summer camp theme was really cute. Greg Cottrell, owner of Concord & 9th and designer of several of their products, was the “camp director” and six talented card makers led the classes and served as “camp counselors.” Campers were split into six cabins named after colors in the Concord & 9th product suite that were used throughout camp: Stardust, Oceanside, Sea Glass, Midnight, Clover, and Honeysuckle. I was in the Clover cabin, led by camp counselor Cathy Zielske, and received a pin and special die set as a gift for clover campers. Each cabin received a different free gift designed by their camp counselor and at the end of camp we were given the option to purchase a bundle of all the cabins’ custom gifts.
I LOVED the kit that each camper received in the mail. It contained all the stamps, dies, cardstocks, inks, watercolors and several other materials needed to complete eleven projects, as well as lots of fun freebies. We were also given a Field Guide for reference and note taking that listed all the supplies for each craft and showed photos of the completed projects. Campers were given a supply list of tools and things they’d need to use during camp, such as a stamping platform, foam adhesive and bone folder. I had most of the materials already but had to purchase a few items like a watercolor palette for mixing watercolors and a shaping kit containing styluses and a mat for constructing paper flowers for the wreath. Check out the photo below to see everything that came in the kit!

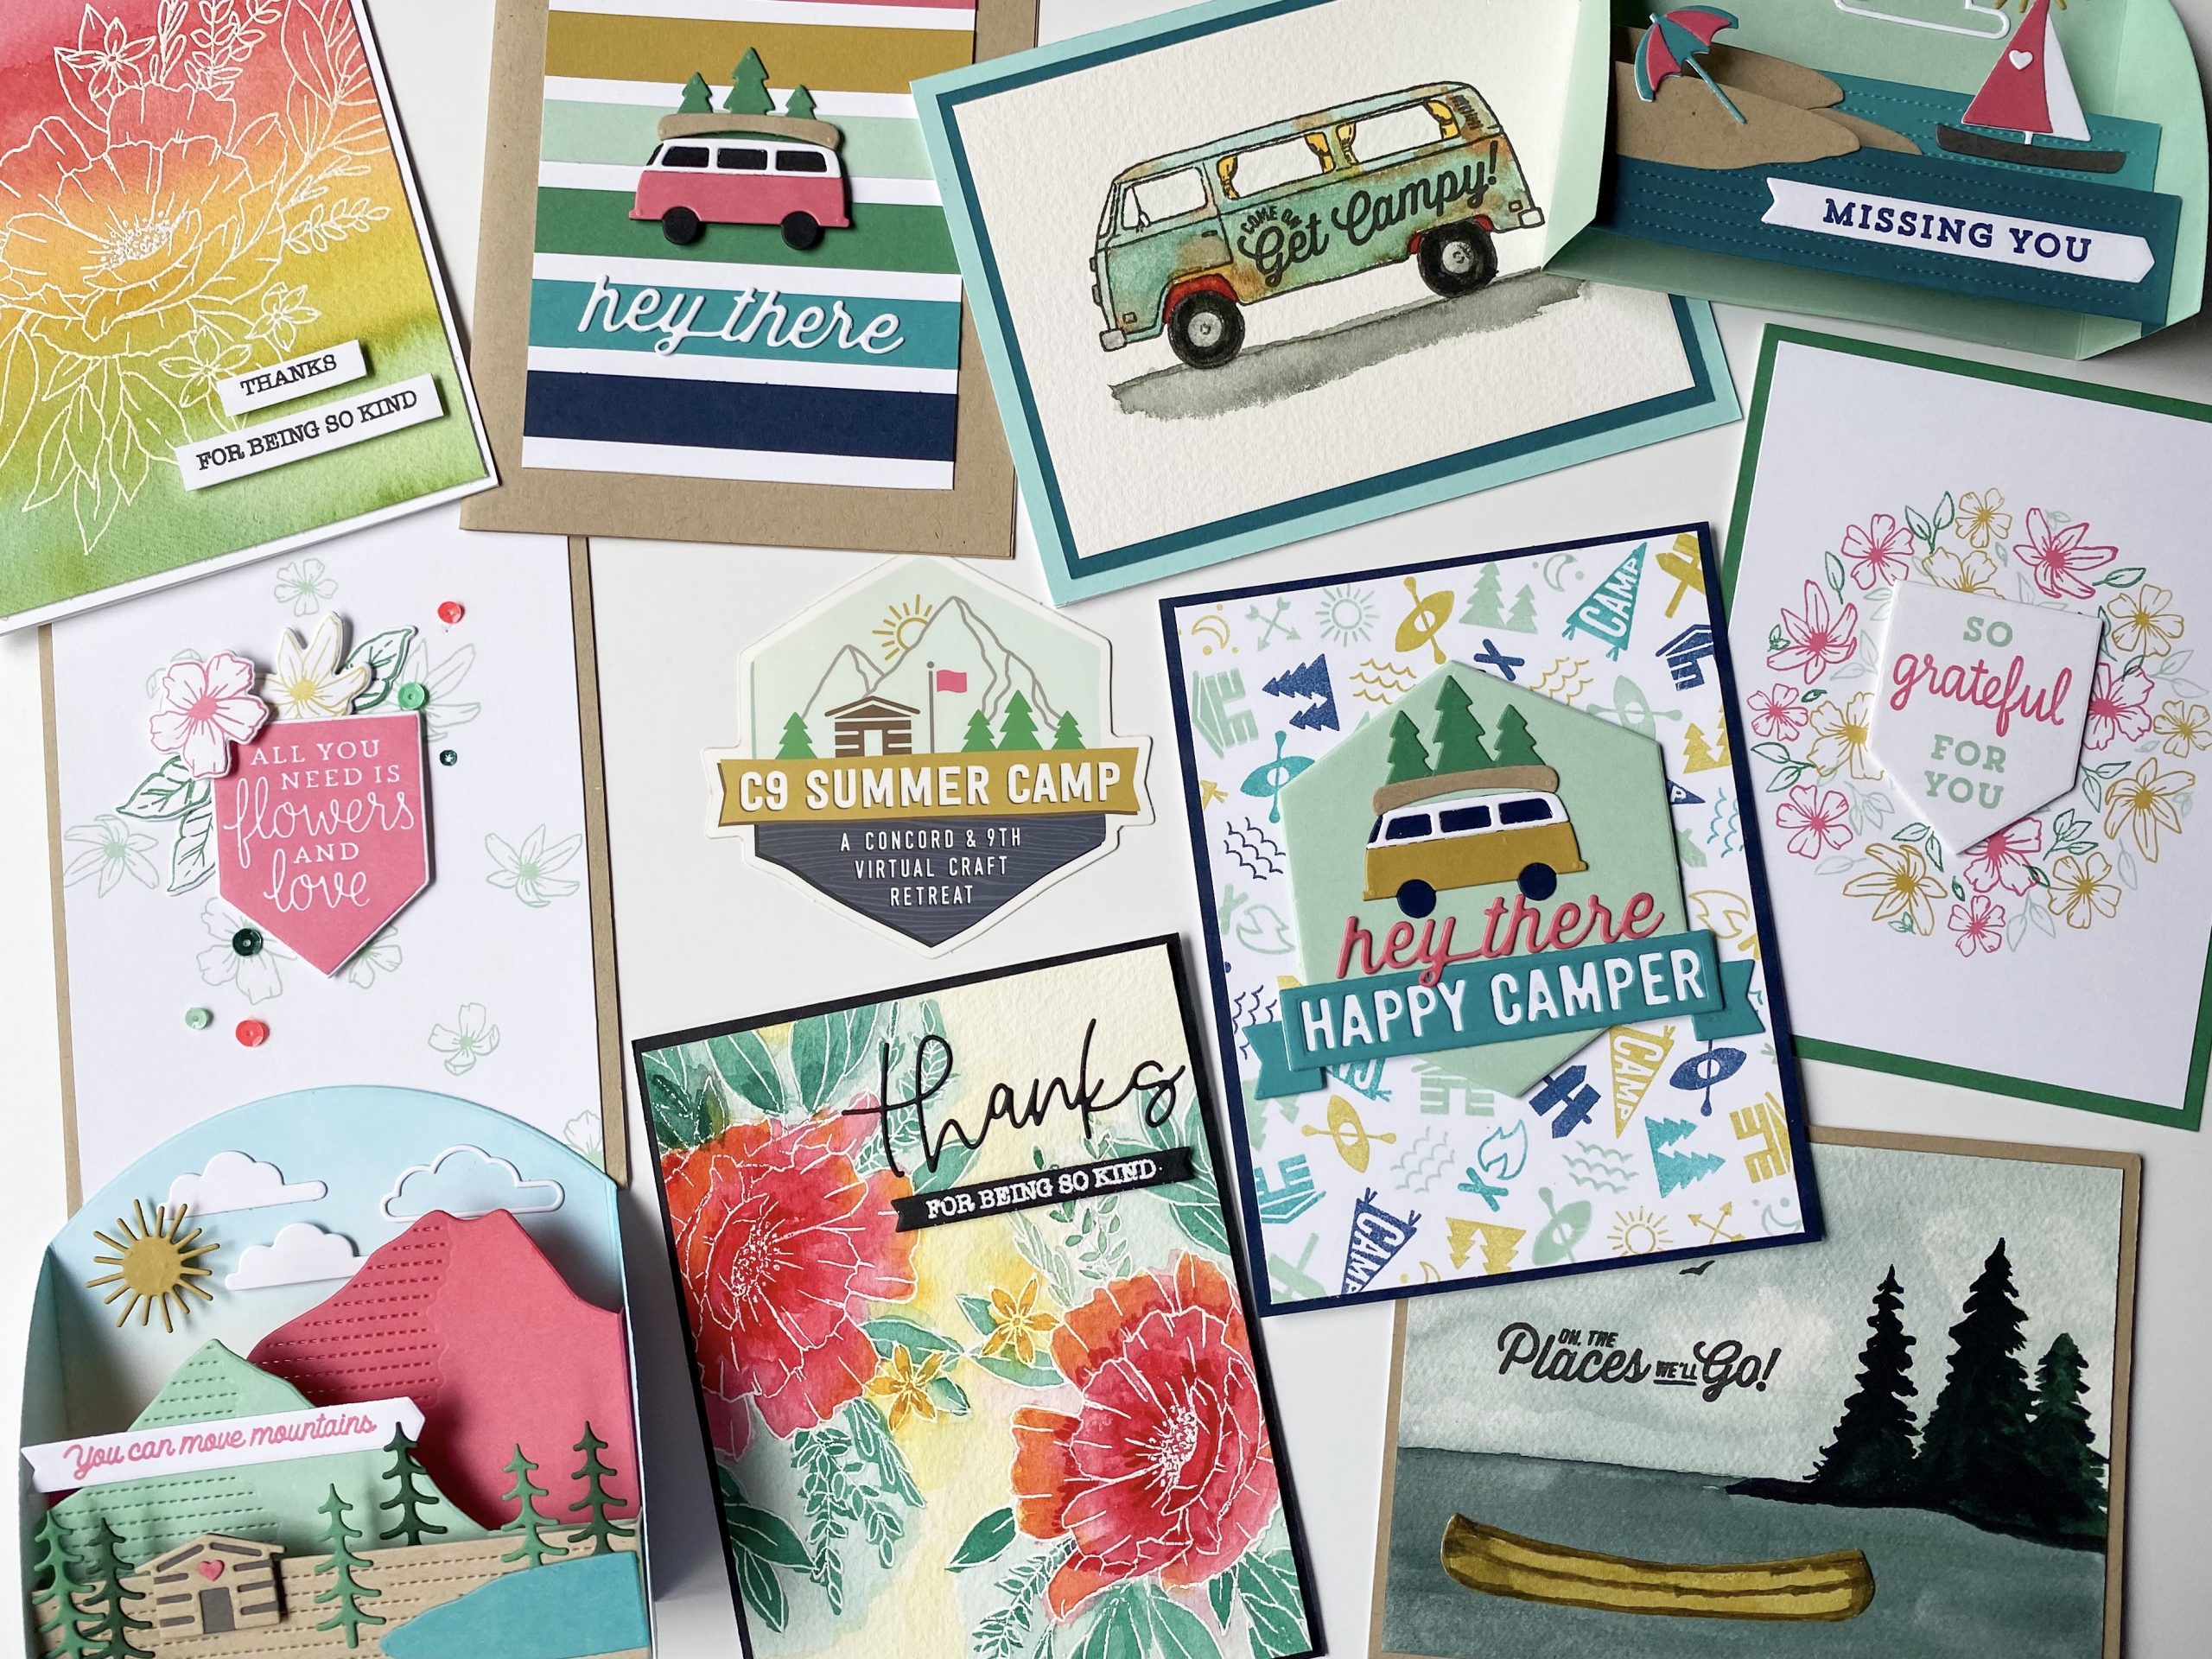
I completed the projects in the order presented during the workshop, and enjoyed learning brand new techniques, becoming more skilled at techniques I hadn’t had a ton of experience with, and learning about new products I hadn’t tried before. I probably wouldn’t have taken the initiative to try some of these types of projects on my own, so it was really neat to have an excuse to make time to learn new things and get out of my crafting comfort zone! There were three class themes – Watercolor, Turnabout, and Arts & Crafts – each of which consisted of multiple parts and projects. Following is a look at all of my paper crafting projects I made during summer camp!
Thanks From All of Us Card
Kristina Werner kicked off C9 Summer Camp with a watercolor class consisting of two card projects. For the first card, watercolor paper was wet completely with water, before painting and blending overlapping stripes of color. While this card dried, we stamped the greeting, which I changed to match the next card’s sentiment since I didn’t want to use “from all of us,” and started on the second card. Once dry, the large flower image was stamped using embossing ink and heat set with white embossing powder.
Included in our kits was a set of vibrant liquid watercolors in dropper bottles. I found them so easy to mix and use. The watercolors were brand new to Concord & 9th. Campers got to try them first before they were available to purchase on their website. I fell in love with them after using them on the four watercolor cards we made during summer camp and found them to be much more versatile than watercolor pans.

Thanks For Being So Kind Card
For this card we stamped and embossed the flower images first, then wet the paper and added in color, the opposite of the first card. Once the paper dried, the flowers and leaves were painted over in many areas with the same colors, resulting in brighter accents of color. The sentiment and watercolor panel were die cut and mounted using black cardstock. I really enjoyed making this card and tried to embrace the imperfections of watercolor, which is hard because I love precision and detail when crafting.

Get Campy Card
Part 2 of Watercolor class was taught by Lydia Fiedler and consisted of this project and the next one. This first one was my favorite of Lydia’s two cards. I love this vintage camper van that is made to look like an old Volkswagen! I watered down the oceanside color considerably to paint the van a pale turquoise, then mixed honeysuckle and buttercup colors to create the orange “rust.” Grey for the tires and road was a mix of clover and honeysuckle colors.
Before we started painting, Lydia demonstrated how to work in sections, wetting one section of the van with water until the paper was shiny, then adding in the color. By working in non-adjacent sections, color could be dropped in until the entire van was painted.

Oh, the Places We’ll Go! Card
For this card, the bottom section was masked off with tape while the sky was painted onto a wet base. Clouds were made by blotting the sky with paper towel. Then the tape was removed and the water was painted similar to the sky. A canoe was stamped, painted, and cut out to add to the scene. I thought this card was a little plain with just the canoe, so I ended up stamping birds and painting in dark green trees.
I’ll admit I was a little relieved when I finished the watercolor portion of camp. I’m always afraid I’m going to mess up a project and have to start over from scratch! I definitely found the four watercolor projects to be the most challenging of the camp techniques and am glad we got to tackle them first. I do love how each watercolored card is one of a kind; there is no way to get exactly the same look each time.

Hey There Happy Camper Card
Time to turn! Concord & 9th is most well known for their exclusive turnabout stamps, which can be used by turning them 90 degrees one, two, three or four times to create backgrounds and focal points with up to four different colors of ink. With their stamps you can create an unlimited supply of patterned paper if you wish. I’d never really taken the time to learn how to use the turnabout stamps properly before camp, just kind of winging it by rotating and stamping the image, so I was happy to learn the proper technique plus tips and tricks for using them in new ways. The key to making the perfect impression with the proper alignment is by using a stamping platform, the included alignment aid, a turnabout jig and temporary adhesive. Step by step visual instructions and an instructional video are on the Concord & 9th website if you’re interested in seeing a demo or learning more about how turnabouts work.
This card was a great way to learn the full technique because we used all four turns of the camp icons stamp and four different ink colors. We also die cut and layered a camper van and sentiment for the focal point. I’m happy with how this card “turned” out!

Hey There Striped Card
This card was super fast and simple to make because there wasn’t any stamping involved or new techniques to learn. The die cutting was very similar to the previous card, while the background was formed by cutting cardstock strips of paper using the six different camp cabin cardstock colors. It was a nice little relaxing “camp intermission” of sorts! Laura Bassen taught this class and the previous one as well.

So Grateful for You Card
Cathy Zielske taught the next two turnabout card projects which make great use of white space and demonstrate that turnabouts don’t always have to fill an entire card front. She taught campers some great tips such a flipping the turnabout jig over to quickly line up a second stamp.

All You Need is Flowers & Love Card
This card has more of an asymmetrical look to it than most turnabout designs, which is further enhanced by stamping and die cutting individual flowers and leaves from the stamp set then popping them up with two different depths of dimensional adhesives tucked under with the sentiment banner in the center. Using a stamping platform allows you to repeatedly stamp an image with precision, best demonstrated here by looking at the sentiment, where the honeysuckle background ink color is nice and uniform from stamping it more than one time to lay down even coverage of the ink. I decided to dress the card up with sequins to add even more interest and dimension. I really enjoyed making the turnabout cards!

Cabin in the Mountains
Caly Person taught us how to make two three-dimensional cards that fold flat for mailing using the mountain stacks stamp and die set from the kit. When I saw the samples in the field guide, I was immediately intimidated because I’ve always found 3D cards to be a bit challenging and don’t make a whole lot of them. I was surprised how easy and quickly these cards came together! They turned out to be two of my favorite camp projects and I’d love to make more cards like these in the future. The card base backdrop was ink blended to create a sun-dappled sky, then folded. Die strips called stacks were adhered to the backdrop at both ends and layered while it was folded flat. Then all the little landscape pieces were die cut and glued to the stacks layers to create the dimensional scene. So fun!

Missing You Ocean Scene
The same techniques described above for Cabin in the Mountains were used to create this card. By changing the color of the cardstock that is die cut, the land stacks were transformed into ocean stacks, and the versatile water shape became a beach shape.

Floral Wreath
I was most intimidated by this project, not because it looked impossible, but because it looked like it would take a long time to complete (and it did!). I dragged my feet and let several weeks go by before tackling this project. Sixty (!) total shapes had to be die cut before even beginning, so I spent one evening just cutting out all the various flower shapes and pieces, and another day making the flowers and assembling the wreath. Becky Roberts taught this class, demonstrating how to shape each leaf and petal with a stylus and molding mat, and how to assemble each flower. She explained that she enjoys dimensional paper projects such as this more than making cards, but all of her card designs are absolutely gorgeous too (and tend to include a lot of dimension on them!). Becky used hot glue to assemble all the flowers, but I used a tape runner instead because I didn’t want to wait for the glue to dry and cool and all the tiny pieces made me think I’d probably burn my fingertips off in the process! Once I assembled all the flowers, I did use hot glue to attach them to the wreath. A small wood wreath frame was included in the kit but I ended up using a larger wreath I found on clearance at Meijer for extra dimension and the bigger size.

Summer Camp was such a hit with all the campers that we suggested Concord & 9th hold a similar virtual event for Christmas crafting, and I was thrilled when they announced a Holly Jolly Workshop would be taking place November 12 and 13th. I signed up immediately, of course! Stay tuned to see what I make during the workshop, and cross your fingers I can complete all the projects in time for Christmas!
In the meantime, here are a few more photos of my projects. Which of the eleven projects is your favorite?


Related Posts

Where Creativity Meets C9 Challenge #24: Anything Goes
August’s challenge hosted by the blog Where Creativity Meets C9 is Anything Goes…
30 September, 2021
Where Creativity Meets C9 Challenge #23: Mixed Media
This is my first time participating in a monthly challenge for Where Creativity Meets C9…
30 September, 2021
Allison | 30th Sep 21
Wonderful review of this event. It’s inspired me to return to our class book and make some more!
Carrie | 1st Oct 21
What a great way to wrap up the summer!! I love all of your projects!!
Happy 4th anniversary!! 🎉🎉🎉🎉
Marilee Breimeir | 4th Oct 21
Love, Love the paper floral wreath! Also the watercolor cards are beautiful. Those look fun to make, but I am not good at stamping.
Happy 4th Anniversary, Gnome Decor! 🥂 We ❤️ Your blog!