A Hauntingly Sweet Halloween Cookie House

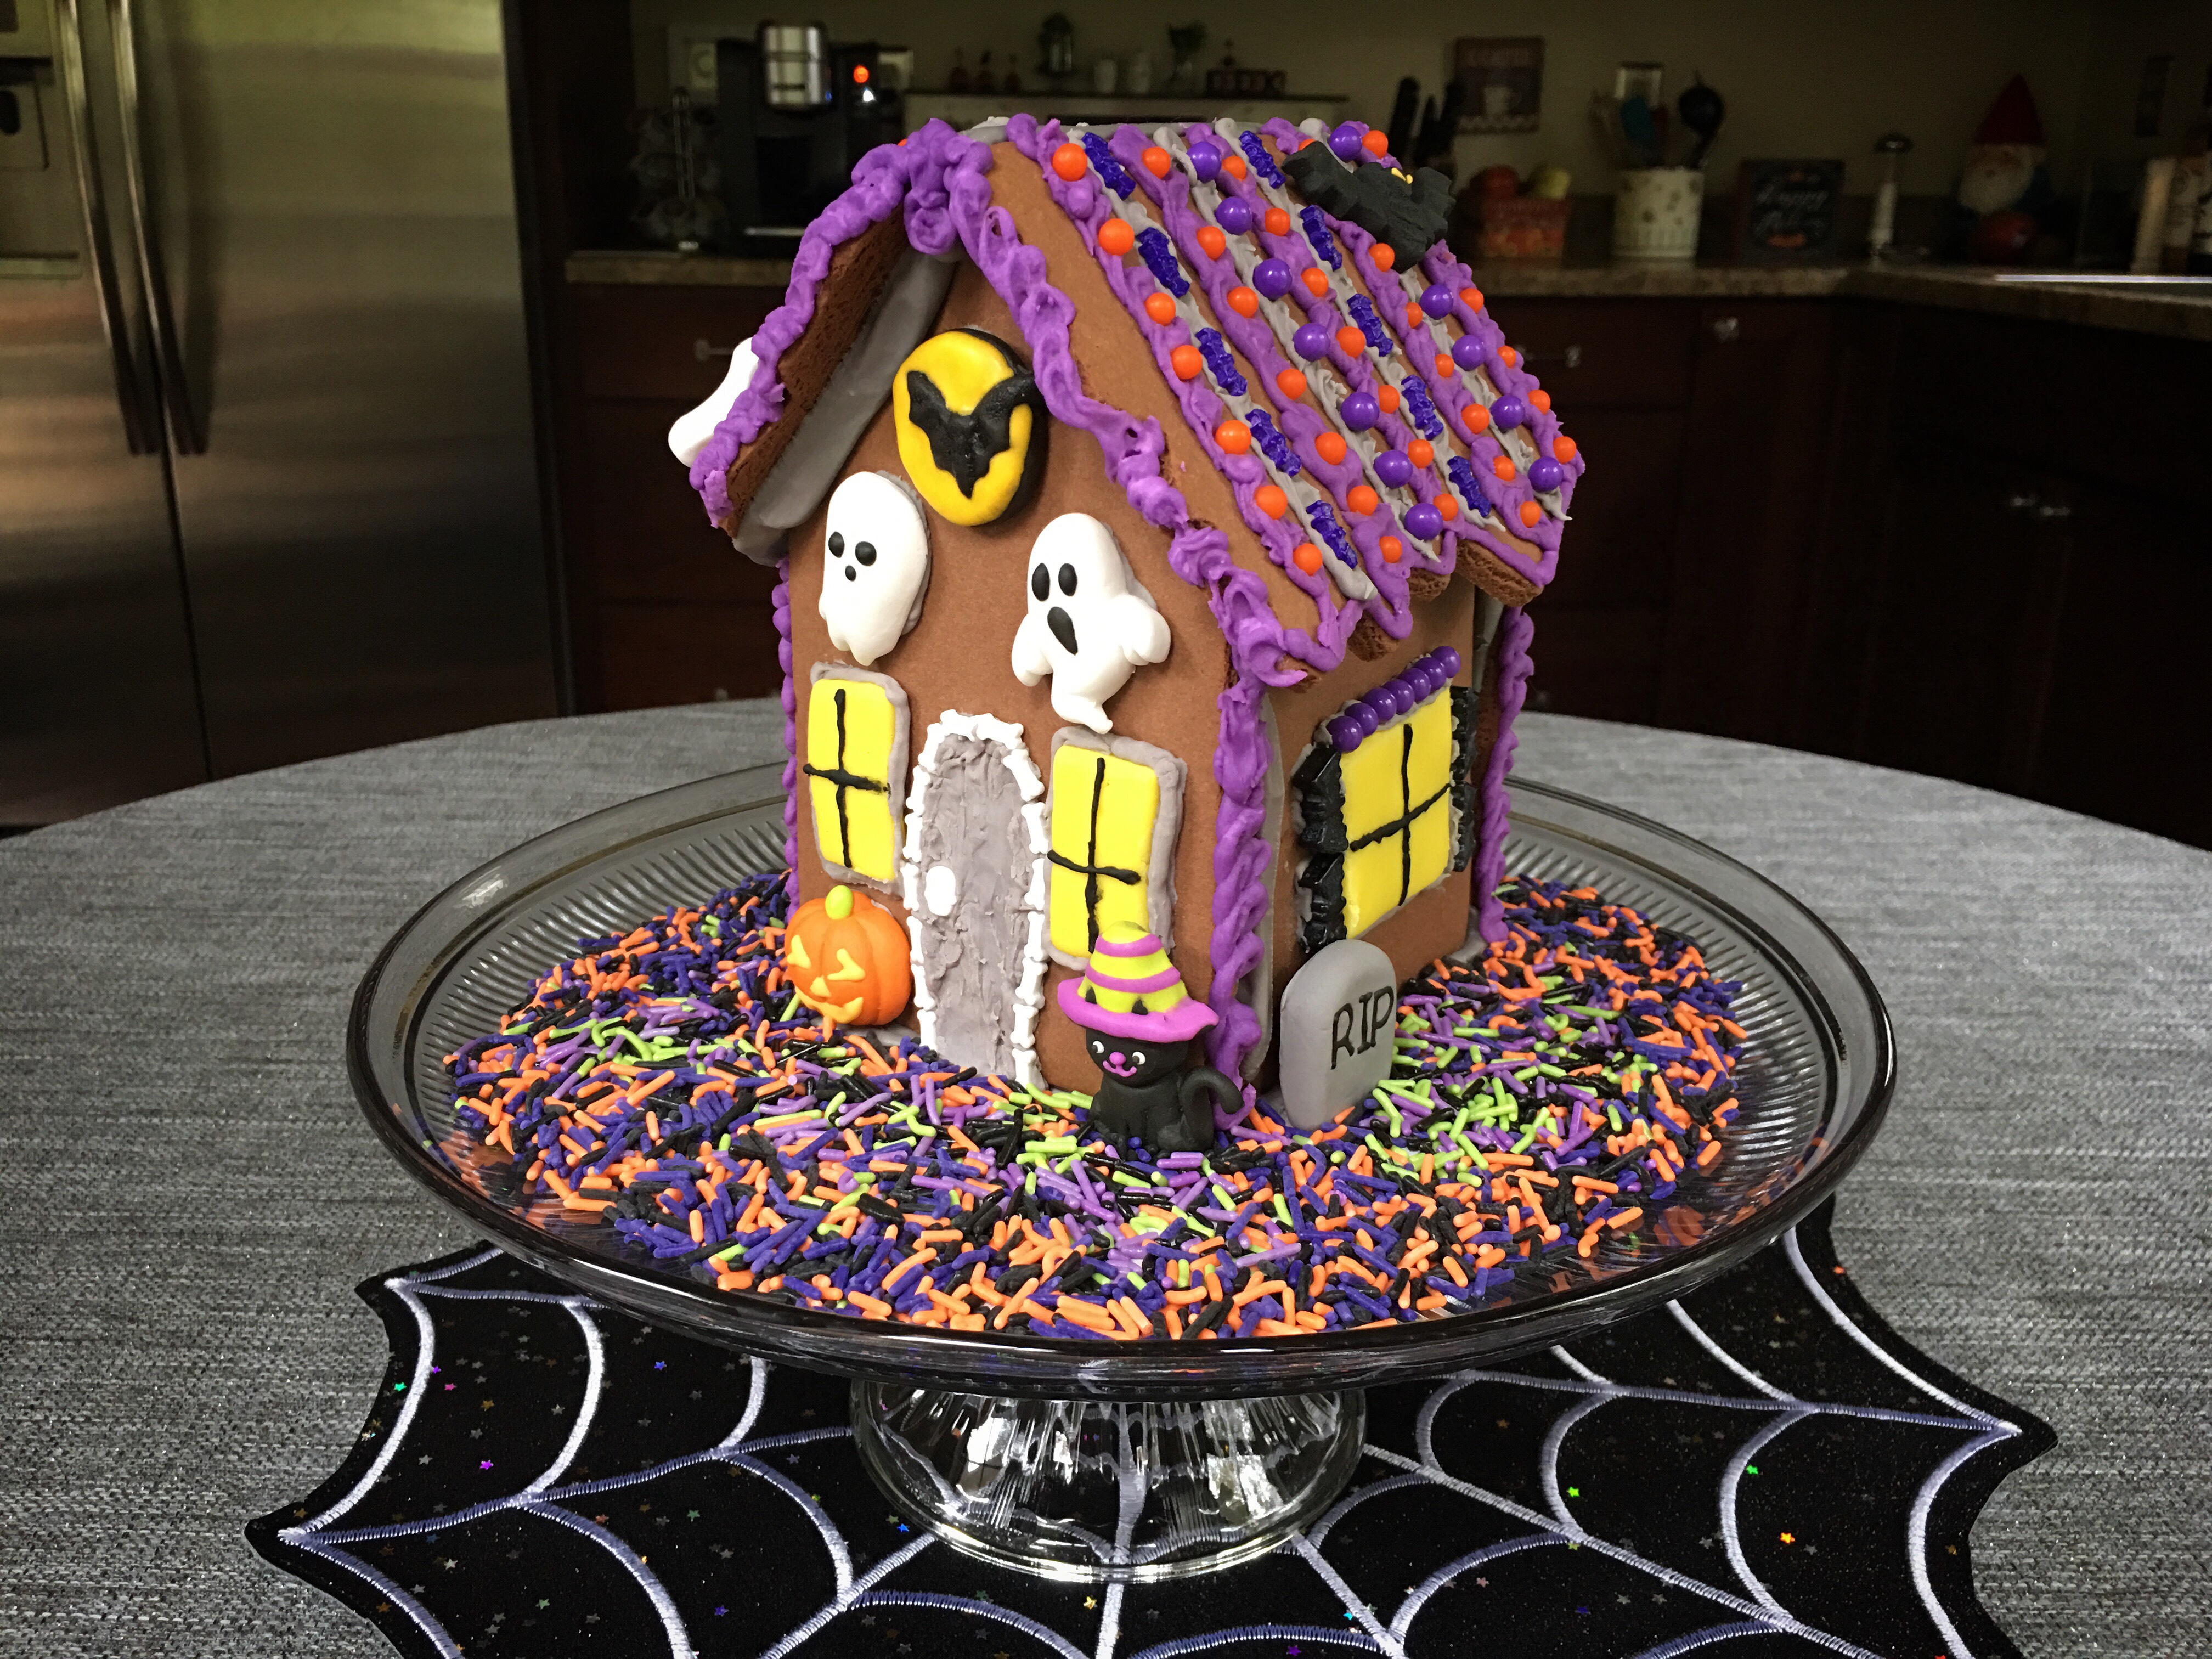
Halloween is nearly here! This time of year is filled with lots of sweet treats, and today I’m sharing one that makes a cute kitchen centerpiece: a Halloween themed gingerbread house. I love decorating gingerbread cookies and houses, but I’ve only made them at Christmas time until now. In recent years I’ve noticed that gingerbread kits are available for several holidays throughout the year. My local Meijer store had this gingerbread house kit made by Wilton, along with a whole section of Halloween themed candy decorations to add to baked goods and gingerbread houses. I’ve also seen this kit at JoAnn Crafts and Wal-Mart. Technically it’s a chocolate cookie house and not made of gingerbread. It smelled so good when I unwrapped it, like I’d just baked a batch of chocolate cookies. My mom first brought the kit to my attention, and I was sold when I saw the house was pre-assembled. That definitely saves time, because you can jump right in to decorating and don’t have to wait for the icing holding your house together to set after you build it. At Christmas I only buy the pre-assembled houses now that they are an option. It’s just so much easier and quicker, especially when you’re pressed for time around the holidays. Another good thing about this kit is that the icing and fondant are ready to use and you don’t have to mix or add anything to them. The box says you need cornstarch and confectioner’s sugar as additional ingredients, but I found neither were required. Everything you need to finish the house is in the kit, although I bought additional sprinkles and candy decorations (also made by Wilton) to add more color and accents to the house. Additional tools you might want to have on hand are a rolling pin, angled spatula, and a table knife, but none are completely necessary.

I thought a little bit about how I might like the haunted house to look before I started, then improvised as I went along. I like my Halloween decorations to be spooky cute and not too scary and my cookie house reflects that. I made my house Thursday night after work and it took the whole evening to make – 3.5 hours to be exact. I started out very slow and methodical, and by the end I was just rapidly squeezing icing out everywhere so I could finish it and eat a very late dinner and go to bed! As I worked, I became aware of small cracks in several parts of the house, so I tried to be pretty gentle when I held it and applied icing.

To prepare the decorating bags, I snipped almost an inch off the end of each one and inserted the plastic tips included with the kit. It’s best to snip less than an inch at first, to make sure you don’t take too much off and the opening is small enough that the tip doesn’t come out completely. Then you can keep trimming until the tip sticks out about half an inch out the end of the bag. There are instructions included in the box on how to fill and close the bag and dispense icing if you’ve never used decorating bags before. They’re not too hard to get used to although it’s easy to make a mess if you’re not careful. I filled just the grey icing bag to begin with.

I started out by making the yellow fondant windows. The windows were actually one of the easiest parts of the whole process. I flattened the fondant on waxed paper with my palm and then used a rolling pin to roll it out like I was going to make cutout cookies. I cut a large rectangle and a smaller rectangle using a table knife, then cut each one in half. I “glued” the smaller pieces to the front of the house for windows using grey icing, and used the larger pieces on the sides of the house for windows.

Next I made the door. I tried to copy the coffin shape shown on the box. I used an angled spatula to smooth the icing with limited success. It kept sticking to the metal so I finished by smoothing it with my finger. It was a bit uneven so I outlined the area with tiny bones from a skull and bones sprinkles mix. I used one of the skulls for a doorknob.

I went back to working on the windows. I outlined each one with grey icing. Then I added round purple sprinkles that came in the kit along the tops of the larger windows on the sides of the house. Shutters were made from bat sprinkles that came in the kit. I used the tube of black icing from the kit to create the window panes. I found the thin black icing hard to work with so I used as little as possible.

I filled the second bag with purple icing and outlined the house and roof, using a squiggly pattern on the edges of the house and front and back of the roof. I glued the large candy decorations on the house using grey icing. These eight pieces (ghosts, cat, spider web, tombstone, etc.) were a nice shortcut to add super cute details with no effort and no risk of messing things up! The last part of the house I decorated was the roof. I alternated squiggly stripes of purple and grey icing and added orange and purple round sprinkles to the stripes, and also some purple bats because there weren’t enough of the round sprinkles included in the kit.


Finally, I set the decorated house and its cardboard base on a cake stand and used two sprinkle mixes to cover the cardboard. The sprinkle mixes contained white ghosts, which I picked out. Normally I use shredded coconut as “snow” for my Christmas gingerbread houses so it took me awhile to decide what to use on the base. I almost went with green sprinkles for grass.

Unfortunately I don’t have any in-progress photos to share. I took a couple but my hands were messy, my photos were of really poor quality, and documenting as I went along was slowing me down. Later after I cleaned up the table, I realized my camera lens was just dirty so that explained the bad picture quality! Here is a “before” photo to show you what I’m talking about.

My friend Katie who lives in Virginia also bought one of these kits and it was fun to discuss our projects with each other by text last week as we made them. She used just the contents of the kit to create her first ever gingerbread house, which turned out super cute! I am impressed with how well she was able to work with the black icing. Her window panes are so even. I love how she covered the cardboard base with grey icing and then added a fondant cobblestone sidewalk.

Happy Haunting! Wishing You Lots of Sweet Treats this Halloween!
Denise


Related
Related Posts
Lighting Up 2019 with Silver and Gold: My New Year’s Gingerbread House
Happy New Year! I hope your 2019 is off to a great start! My vacation…
Related
Gingerbread Dreams: Sweet Treats & Shoppe
Merry Christmas! I hope you’re having a wonderful holiday filled with all of…


Marilee | 31st Oct 18
Love it! Turned out So Cute! Like the use of the bats for shutters and bones around the coffin door with the skull doorknob. Oh! The Halloween sprinkles really set it off. How fun and unique. Katie’s turned out nice too using only what came with the kit.
Happy Halloween! 🕷🎃🦇👻