Crafting A Community Garden: Stamp-A-Faire 2018
Papertrey Ink hosted a live crafting event in Cincinnati August 24-25 to go along with their annual online Stamp-a-Faire. I was really excited when I heard about the option to attend in person. The only other live event was held in 2011 for the first ever Stamp-a-Faire, before I knew about Papertrey Ink; I became a customer in 2015. I had so much fun participating in Stamp-a-Faire from home last year that I decided spur of the moment to attend the live event on May 20, the day it was announced and tickets went on sale. This turned out to be a good decision, because the event sold out the same day! One class was held Friday night and the other five classes were on Saturday, all led by the talented Papertrey Ink design team. We received a kit of all the supplies needed to complete the projects plus extra materials and the stamp and die sets so we can create additional projects at home. It was all bundled in a cute tote bag and as we completed each class, we received an enamel pin to match the project. We also received the exclusive Stamp-a-Faire 2018 stamp set called Community Garden in our bags, a collaboration set where each PTI designer contributed different images in the set. Attending live was so fun because we got to meet the designers and Papertrey Ink’s super talented community of crafters and customers. I met so many nice ladies! There was also a Papertrey store set up at the event, which took place at Hyde Park Country Club. New items were added to the store throughout the weekend. Everything was sale priced at just $1 so I loaded up on paper and stamps! The theme for Stamp-a-Faire this year was Crafting A Community Garden, and all of the projects incorporated a flower theme in some fashion. I was excited about this year’s theme, because it combined my two favorite hobbies of crafting and gardening! Here are the six projects I made. I completed two during the classes, and finished up the other four projects Sunday, Monday and Tuesday after I returned home.
Creating Plantable Paper

In this class Heather Nichols showed us how to make handmade paper using shredded paper, a blender, and a mold and deckle. The paper pulp was placed in a large plastic bin filled with water. Glitter, dried flowers and flower seeds were all added to the water to be incorporated into the paper. By adding the seed packet, the paper can be planted later to grow flowers. The sheets of paper were stacked as we made them with cotton muslin separating each sheet and a sponge was used to remove excess water. We used masking tape on the muslin to label the sheets with our names. The design team laid out the paper in their warehouse to dry overnight and then we picked up our handmade paper Saturday at the end of Stamp-a-Faire. This was a simple, quick and fun project to kick off Stamp-a-Faire Friday night. I made one sheet each of pink and blue paper. I decided to turn my handmade paper into eight mini sheets of paper, slightly smaller than the front of an A2 card. I folded the two handmade paper sheets in quarters, scored each with a bone folder along the folds, and then carefully tore the paper apart along the scored folds. I bundled the paper sheets together with the twine from the garden journal kit and added a stamped tag I made using the event exclusive Community Garden stamp set.


Crafting a Felt Flower Wreath

Lizzie Jones’ class was one of my favorites. I’ve always wanted to learn to make felt flowers for the yarn wreaths I create so I don’t have to purchase them pre-assembled. I found the class to be really relaxing as the only supplies we had to use were a glue gun and die-cut felt to create all the different flower shapes. Petal shapes were folded, pinched or rolled, then glued together. Lizzie did an excellent job demonstrating each step of flower assembly. In this class we made seven of the twelve flowers she demonstrates in her video tutorial. I wasn’t crazy about how one of mine turned out, so I left it out of the photo. I still need to make the leaves and the other five flowers. We were given a small 10” grapevine wreath to decorate with our flowers, but I’d like to make a yarn-wrapped wreath to decorate with mine. This is the one Stamp-A-Faire project I haven’t fully completed yet, but I’ll make sure to share photos when I finish my felt flower wreath.

Water Your Flowers

Another one of my favorite classes at Stamp-A-Faire was Betsy’s Veldman’s no-line watercolor class. One of my card making goals is to learn no-line watercoloring techniques, and this class was a great introduction to them! First we stamped the poppy image in a light grey ink color called soft stone. Betsy showed us how to shade the petals of the poppy with watercolor and techniques like wet-on-wet painting and dry brush blending. We jumped around the flower and worked on petals that were not adjacent to one another, allowing time for the paint to set and the watercolor paper to dry on the previously colored petals so the colors wouldn’t run into each other. After painting the image, you can no longer see the grey stamped lines and it looks like you freehand painted the flower. My poppy ended up with a lightly colored appearance. Normally I do the opposite and use way too much pigment, so I went a little too extreme in the opposite direction. I decided to just keep going with the watery look rather than add more color and try to correct what was already done, because Betsy cautioned against the tendency to keep adding more and more paint and potentially ruin what you’ve already done.
Betsy showed us how an unlimited number of colors can be created from just the four paint colors in our kits. She made this paint swatch to show us all the beautiful colors she mixed by using just our dark blue, yellow, orange-red, and magenta colors! We were given a mini swatch wrapped around our tin of watercolors to experiment with mixing colors and making different shades.
Betsy is so detail-oriented and organized that I would love to take a whole workshop of classes from her. I can’t wait to see what new kits and crafty projects she comes up with next.


Planting Your Garden

In Dawn McVey’s class, we made a card using the familiar techniques of stenciling, die cutting and stamping. We used four different stencils and an ink blending tool to create the leaves, then added the die cut stamped images. I like the summery, tropical ink colors we used to create the stenciled leaves and floral clusters. This was a relatively quick card I’m likely to make more of!

Garden Whimsy Pop-Up Box

Lexi Daly showed us how to create a paper garden pop-up card. It’s a super cute box card that folds flat and fits in a standard size envelope. This project was the most challenging one for me. There were so many little pieces to die cut and keep track of, and I found arranging the flowers and panels so that they fit correctly to be very tricky! I think these cards would get easier to make the more experience you have with them. I had to finish this at home, because I spent my time in class die cutting pieces and learning how to engineer the box. Lexi’s video is super helpful in explaining the whole process.


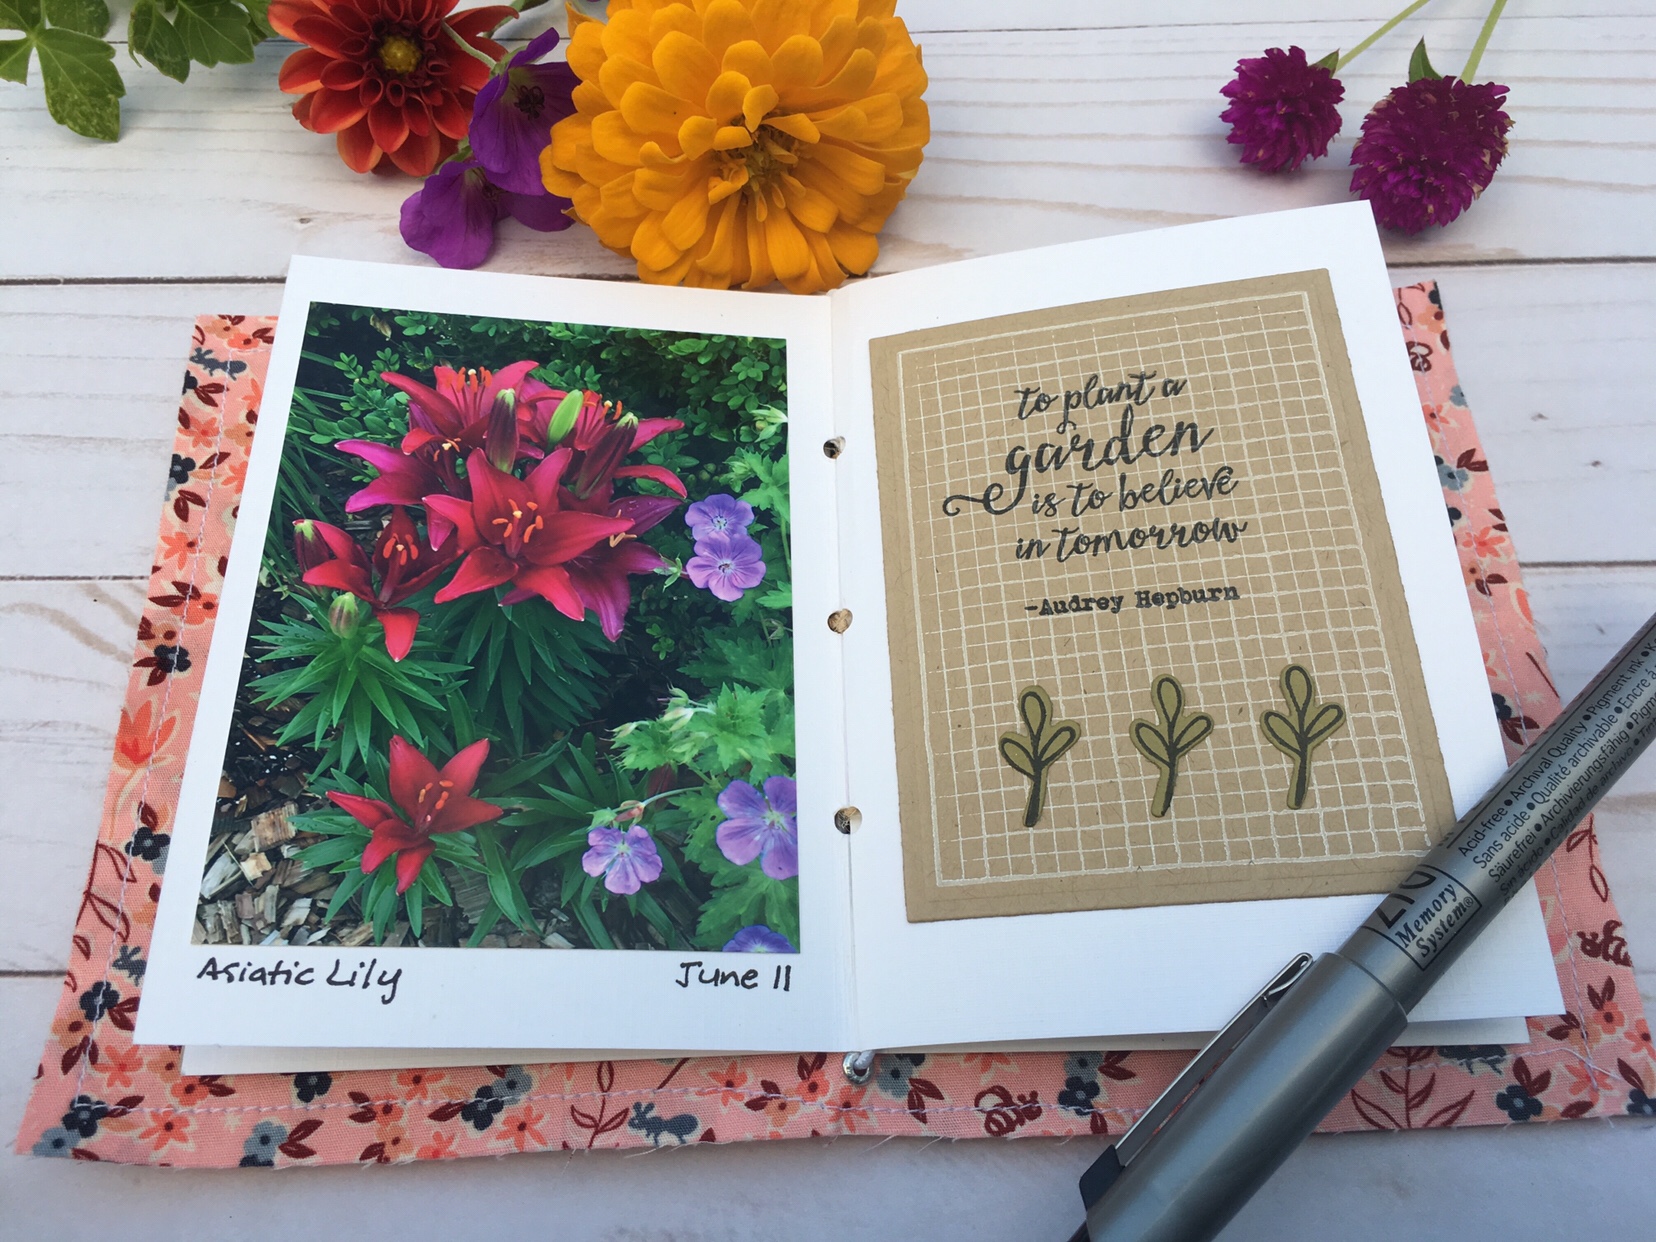
Green Thumb Garden Journal

Heather Nichols’ Green Thumb Garden Journal was one of my favorite projects once it was done! It took the longest to make of all the Stamp-A-Faire projects, but the end result is a cute little keepsake to remember this year’s garden by! This Spring I’d planned to keep a garden journal for the 2018 growing season but I never got around to it. Well this mini version turned out to be the perfect way to document my garden instead! During class I made the fabric cover and bound my pages together using twine and a simple bookbinding technique I’d used a few times before in other classes, then when I got home I printed photos, stamped and die cut images, and decorated the pages. For the cover (the trickiest part to make), we die cut and joined two pieces of fabric together using an iron and fusible web, then stitched around the edges with a sewing machine. Then we set eyelets in it and added an elastic band to hold the journal insert pages. The rest of the project was easy, just time consuming. It sure turned out cute!


Well that’s it! Thanks for stopping by to check out my projects. It’s a good thing Labor Day weekend follows Stamp-A-Faire weekend! I’ll be sleeping in to recover! I hope you’ve had a wonderful summer filled with amazing memories. I’ll leave you with a few more photos from my fun weekend.


Until next year!
Related Posts

A Giveaway to Celebrate Two Years of Gnome Decor!
October 5 UPDATE! We have a winner! Katie Camden won the set of three handmade…
29 August, 2018
Modern Romance: Soft Sage and Rose Gold Cards for A Bride-to-Be’s Wedding Party
Lately I’ve been working on several custom orders, which I love to do because…
29 August, 2018
Tracey M | 1st Sep 18
thanks for sharing so much of your special weekend. Watching it online it appeared everyone was having a wonderful time and you did a beautiful job on your projects. So glad you had fun.
Wendie | 2nd Sep 18
I love all your projects Denise!! The felt flowers are gorgeous! The handmade plantable paper is such a cool idea, and I love your garden journal (something I keep saying I’m going to make and then never do, lol). I’m glad you had fun (even if I wasn’t there, sigh) 🙂
Marilee | 17th Sep 18
What a fun crafting weekend! All your projects are lovely, but I especially like the gardening journal and the felt flower wreath. The hotel was unique too. So glad you were able to go and have a relaxing weekend. 🌸🌼🌺